

January 15, 2008
By Mark Clarkson
 Choose Analysis / Place Scale Marker to put a marker on your image. |
Photoshop is a part of nearly everyone’s toolbox these days. Sure it brightens and enlarges, but did you know it takes calibrated measurements, too? Photoshop CS3 Extended adds a couple of very handy new measurement tools.
Before Photoshop can take accurate measurements, it needs to know what it’s measuring. In Photoshop, everything is in pixels; you need to establish what distance those pixels represent in the real world.
If your image was scanned, and you know — and trust — the resolution assigned to the image, you are good to go. Choose Edit / Preferences / Units & Rulers and select inches, millimeters, or centimeters. The Ruler tool will report measurements in these units.
If that’s not the case — if the exact scale is unknown, unusual, or you’d just like to double-check the scan resolution — Photoshop will calculate your scale for you.
Find an item of known dimension in your image. It’s best if you include a graduated slide or a ruler in the photo but if not, you can set the scale by using any component of known size.
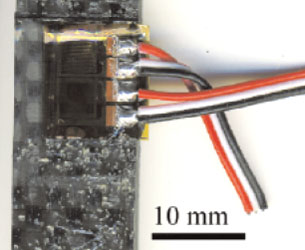
For example, the photo on this page shows a strain gauge. I know that the connectors are 2mm wide. That can provide my scale. Important Note: Your measurements are only going to be as good as your resolution, so start with the highest resolution images practical.
This Is How We Do It
With your photo open in Photoshop, zoom in on the area you are going to measure. From the main menu, select Analysis / Set Measurement Scale / Custom. The Measurement Scale dialog appears and the Ruler tool is automatically selected.
Click-and-drag on your photo to create a ruler line from one edge of your measured item to the other. As you drag, the Measurement Scale dialog updates the measured length. You can drag either end of the ruler line to fine-tune the placement. Try to get things as exact as possible. Don’t hit OK just yet.
Fill in the Logical Length and Logical Units fields of the dialog. For example, I’ve measured the width of a small connector that I know is 2mm, so my Logical Length is two, and my Logical Units are in millimeters. You can save this scale as a preset if you have a number of images at the same scale. With the next image, just select the preset, rather than re-measuring. Now click OK to accept your settings.
Measuring
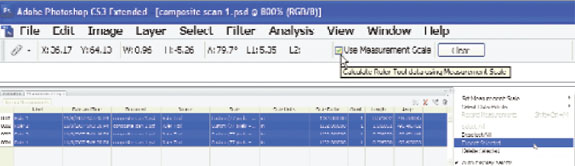
Select the Ruler tool. In the option bar, make sure Use Measurement Scale is selected, or the ruler will measure relative to the image’s resolution settings, rather than the scale you just calculated.
Click-and-drag anywhere on the photo to measure; all measurements are in the scale and units you’ve defined. In the option bar, Photoshop reports the length of the ruler line (L1), its angle (A), its width and height (W, H), and the x,y coordinates of its starting point.
You may have noticed that there is a second length readout in the option bar, labeled L2, which is blank. To measure this second length, hold down Alt (Option on a Mac) and click-and-drag on either of the endpoints of your measurement line to pull out a second measurement line, at an angle.
L2 now gives you the length of this second segment; the angle (A) now displays the angle between the two ruler lines.
 Top: The Ruler Tool option bar displays current measurements.Bottom: You can save your logged measurements as a tab-delimited file. |
Count It
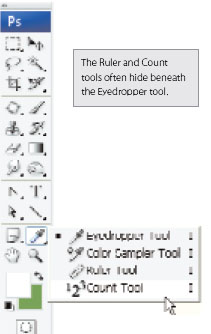
Photoshop CS3 Extended adds a simple but useful count tool. You’ll find it hiding in the tool palette, under the Ruler and Eyedropper tools.
 |
The Count tool simply counts clicks. When active, it places a small, numbered marker on your photo with every click of the mouse. Photoshop tracks the count for you, displaying it in the option bar.
If you have to count dozens of air bubbles in a square of carbon composite, or cars in a parking lot, or hairline cracks in a sample of stressed metal, this simple count tool can be a great help.
Log It
Although you can count as many objects as you’d like, you can only make one measurement at a time. Measure a second item, and your first measurement disappears.
You can, however, record your measurements and counts.
From the main menu, choose Analysis / Record Measurements. This will open the Measurement Log panel, and record the data from the currently selected tool. It can also record the document name, the date, your scale, the height and width of any selections, and an assortment of other data. Fortunately, you can select the data points to log and those to ignore. With the Measurement Log window open (Window / Measurement Log), click the nearly invisible triangle at top right and, from the pop-up menu, choose Select Data Points / Custom.
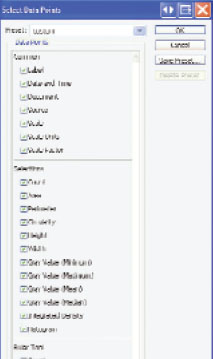 You can select which data to log. |
It would be great if you could save this log directly in your Photoshop file but, sadly, you can’t. You can, however, export the log as tab-delimited ASCII text file.
In the Measurement Log window, select the measurements you want to export. Now, click the tiny triangle at the upper right of the palette and choose Export Selected from the pop-up menu. The resulting log file can be read into Excel or your favorite database or analysis application.
The log is not cleared when you close a document, or switch documents, so you can record measurements from several photos in the same log.
When combined with Photoshop’s native image manipulation abilities — sharpening, increasing contrast, manipulating lighting, and so forth — these new analysis capabilities make Photoshop an even more powerful tool for anyone examining photographic data.
Photoshop isn’t your typical engineering environment but, as long as you’re in there, cropping, rotating and resizing, you might as well collect a little data.
More Info:
Adobe Photoshop CS3 Extended
Adobe Systems, Inc.
San Jose,CA
adobe.com
MSRP: $999.00 – Upgrades from $349
Contributing Editor Mark Clarkson has been writing about all manner of computer stuff for years. An expert in computer animation and graphics, his newest book is “Photoshop Elements by Example.” Visit him on the web at markclarkson.com or send e-mail about this article c/o [email protected].
Subscribe to our FREE magazine, FREE email newsletters or both!
About the Author
Mark ClarksonContributing Editor Mark Clarkson is Digital Engineering’s expert in visualization, computer animation, and graphics. His newest book is Photoshop Elements by Example. Visit him on the web at MarkClarkson.com or send e-mail about this article to [email protected].
Follow DE

