First Article Inspection Best Practices
December 4, 2014
 Dear Desktop Engineering Reader:
The thumbnail description of first article inspection in manufacturing quality control is deceptively simple: You inspect pre-production part samples to confirm that the parts meet all design, engineering and specification requirements. “Deceptively” because the criticality of first article inspection to your quality control initiatives and to your company’s bottom line cannot be overstated. Get it wrong and you can make piles of scraps, incur hours of wasted effort or needless rework and reap all the headaches that come cascading in when you miss deadlines.
Oddly with all that’s at stake here, first article inspection just doesn’t get the coverage in the design through manufacturing press it deserves. Maybe that’s because it doesn’t have screenshots with blazing colors like a stress analysis or something. I dunno. But what is clear is that today’s Check it Out link takes you to a pretty darn good on-demand presentation on first article inspection. It’s worth your time. Here’s why.
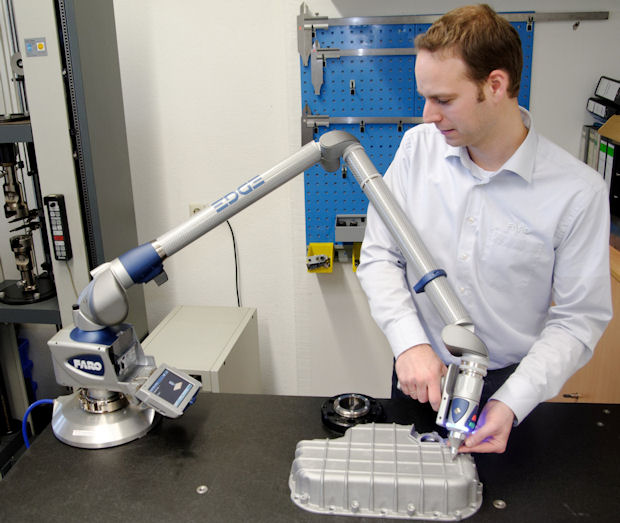
The “First Article Inspection Best Practices” on-demand webinar from FARO Technologies runs a shade less than an hour, including Q&A. It is tutorial in nature for anyone using FARO portable CMMs (coordinate measurement machines), such as the FaroArm or the FARO Gage. As you would expect, portable CMMs and software from FARO Technologies are used throughout. But this on-demand webinar is not a thinly disguised ad by a long shot
Instead, this presentation is easily understandable and filled with helpful tips for anyone doing first article inspections regardless of their equipment. For those of you who need to or want to know what first article inspection is all about, this webinar provides a lot of easily digestible information that will help you understand the vital role this technology and its processes fills in your manufacturing quality initiatives.
The webinar begins with a brief introduction to FARO Technologies and a short video overview of first article inspection before getting down to its chief business. The main topic areas of the webinar are inspection set up using portable CMMs, utilizing advanced tools to simplify repeat part inspections and repeat part inspections. The entire main presentation runs some 30-plus minutes. At about the 33-minute mark, the Q&A session begins. Stick around for that. The audience asks some good follow-up questions.
The first topic further breaks out into discussions on traditional inspection call-outs — that is, dimensions, lengths and diameters — part set up, portable CMM set up and best practices. This is where the action is for both those of you looking to pick up some good tips and those trying to get some learning.
In a nutshell, this section provides a thorough explanation on how easy it can be to muff up your inspections if you do not pay close attention during setup and then what you can do about it. For example, stabilizing and securing your part of interest is a no-brainer. You can’t accurately scan something that’s jiggling around. But you must also stabilize and secure your portable CMM in relation to the part. Why? Well, somebody, maybe you, can bump into your portable CMM and knock it off a hair. One neat trick from here is to use hot glue around the edges of the part and the portable CMM. It dries clear, removes easily and turns white if moved.
Calibration of your portable CMM gets a detailed airing. A key lesson here is that you should recalibrate at least weekly if not more often. A complementary topic discussed in detail is probe compensation. Basically, this means accounting for the gap between the center of your probe and the measurement. You’ll see that it’s not as easy or as hard as it may sound, but, if it’s not done right, it’s pretty easy to skew your measurements. You learn how to handle probe compensation correctly.
The discussion on tricky lengths and how to handle them properly will interest many viewers. Tricky lengths are things like a link to a line or a line to a plane. Angles get a good look at here as well. Angles, in fact, come back later in the Q&A session for further discussion.
The advanced tools discussion offers advice such as identifying like parts and then picking the most complicated part to use for your set-up inspection plan. Why? Well, after you set up the complicated part, you can then skip over details that are not applicable with a like part, saving you time and effort.
And on it goes. All of “First Article Inspection Best Practices” is really all about best practices. During every discussion and at every segue to the next topic, the presenter slides you some sort of tip, trick or word to the wise that’ll help you get the most out of your first article inspections. The presenter, an applications engineer at FARO Technologies, knows her stuff, and she knows how to present it. Hit today’s Check it Out link, watch “First Article Inspection Best Practices” (registration free) and see for yourself. Good stuff.
Thanks, Pal. – Lockwood
Anthony J. Lockwood
Editor at Large, Desktop Engineering
Subscribe to our FREE magazine, FREE email newsletters or both!
About the Author
Anthony J. Lockwood is Digital Engineering’s founding editor. He is now retired. Contact him via [email protected].
Follow DE
