Luxology modo 701
modo 701, the latest version of Luxology's polygon and subdivision surface modeler and renderer, has some impressive new features.


July 1, 2013
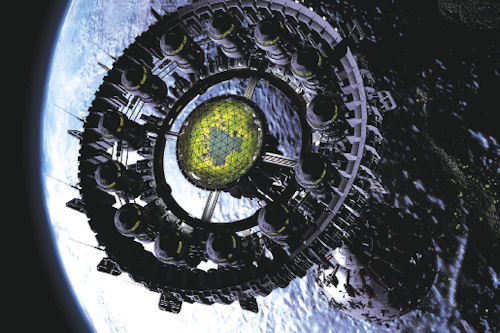 This 15 million-polygon scene renders twice as quickly in 701. This 15 million-polygon scene renders twice as quickly in 701. |
To compare the two, I loaded a scene with 15 million-plus polygons, turned on global illumination and hit F9. 601 took 12 minutes (and a second) to render a high-resolution still. 701 completed the same render in only six minutes (and a second). Other tests were, admittedly, less dramatic—and occasionally, 701 came in just a touch slower than 601. But things were faster overall.
Replication
Lets talk about that scene for a minute. It’s actually a space station and, for all its geometric complexity, it was surprisingly simple to put together, thanks to one of modo’s interesting features: replicators. Replicators aren’t new to 701, but I haven’t given them a lot of love in previous reviews.
Replicators are copies of a mesh ... sort of. Let’s say you want to create a 4x4x4 array of a part. You could use the Array tool to create 63 duplicates of that mesh, but that makes your scene 64 times as heavy; you have 64 times the geometry.
Instead, you use the Replicator Array tool. Your final scene renders the same way, but you haven’t really increased the geometry at all. modo merely notes all the places where that geometry should appear at render or display time, and draws them in.
Replicators have some key advantages beyond lighter-weight scenes. Any change you make to the base mesh is instantly—well, replicated in all the copies. If you create a traditional array of objects, each will have to be modified individually.
Another advantage is speed. modo renders replicators more quickly than actual meshes. It’s often twice as fast, and almost always at least 15% to 20% faster with large arrays.
A third advantage stems from the way replicators work. Replicators use point clouds. In the example above, the Replica Array tool created an array of 64 points, arranged in a cuboid; that’s the point cloud. At render time, modo renders as though there was a copy of the base mesh at each of those points.
The Replica Array and similar tools create point clouds for you, but you can roll your own, or use existing geometry. Perhaps you’d like to place drops of condensation on a beer bottle. Or trees on a landscape. Or balconies on a building. Or feathers on a bird. Use the vertices of your bottle, building or bird as your point cloud; create a single drop, balcony or feather; and replicate away.
My CPU-grinding space station is made from a handful of parts replicated four or 52 or more times. They’re mostly in the form of radial arrays around the center point, but some are also as trees scattered across the landscape of the glass-domed park.
Progressive Refinement
No one likes waiting for renders to complete to judge the results. That’s where progressive refinement comes in. (Progressive refinement rendering is a key feature of easy rendering applications like Keyshot and Bunkspeed.) In a progressive render, the entire scene is rendered more or less at once, very roughly, and then refined over and over until you stop it—or until it meets a specified quality or time.
modo has been doing something like this for awhile now, with its RayGL preview windows. But RayGL windows always stop somewhere short of full render quality and, as importantly, they’re small—often just a quarter of the screen.
701’s new render preview takes a big step beyond: It will work at full final render resolutions, zooming out as needed to fit in the preview window. It will continue refining renders until it hits the specified quality settings. In fact, it will continue refining forever if you tell it to.
You can easily save the rendered images and—here’s the really cool part—you can save the state of the render. If the render’s been cooking for an hour and you have to interrupt the application, those 60 minutes aren’t lost. Save the render state and, when you load it up again, modo picks right up where it left off.
Holding the mouse over the preview window will focus the renderer’s attention on the area under the mouse, allowing you to refine selected areas.
Progressive rendering is great, but it doesn’t quite replace the standard renderer yet. You can’t save separate passes and layers (alpha, reflections, etc.). You also don’t have the full renderer’s panoply of image controls, for example.
Retopology
modo does a really good job at retopology, or recreating existing meshes—usually masses of triangles imported from another application. Place an imported mesh in the background, and modo will let you create a new, clean mesh in the foreground.
601 introduced a unified retopology pen tool that takes care of all your retopologizing needs. Luxology has further refined the process in 701, giving the pen more powers to reduce your total clicks and further speed up the whole process.
My favorite new tools here are Contour and Continuous Bridge. The contour tool slices through geometry with a plane, producing a curve or polyline that defines the intersection—like a line drawn around the outside of the mesh. You might take five or 10 slices through a human arm or a computer mouse, then use the Continuous Bridge tool to connect these curves together to recreate a new version of the original base mesh.
Interface Changes and Improvements
There are a lot of little improvements that speed up common tasks. I’m very happy to see the new Merge and Unmerge commands. Merge combines meshes from different layers, while Unmerge breaks up objects into their constituent meshes and distributes those to different layers. I do both operations all the time.
I’m even happier to see color-coding available on all layers—meshes, lights, image maps, etc. You can also drag-select the visibility of layers, turning whole swaths on and off easily. That’s something that’s previously been a real pain in modo.
modo has rearranged its workspaces, from a little to a lot. The modeling workspace looks familiar, while the new animation workspace is nearly unrecognizable and somewhat overwhelming. A single, horizontal palette holds virtually every control you’ll need for animation.
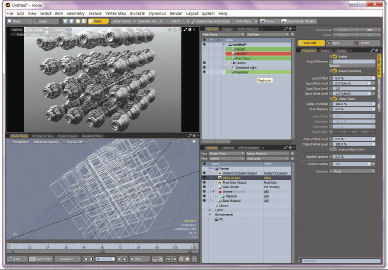 Creating a replicator array of engine nacelles. Note that modo’s layers can now be color-coded. |
 The new pop-up Layout Switcher replaces the layout tabs in previous versions. |
Too Much for the Likes of Us?
The impressive improvements are mostly in animation, particles and simulation. I’m guessing that very few of us are doing particle simulations and character animation. The improved graph editor and Python support are definite pluses, but do you need sculptable particles that interact with soft cloth? Many of us are using modo for hard surface modeling, and for importing and rendering mechanical designs from other applications. Sexy new features tend to be of less interest.
And the price, of course, goes up. 701 retails for $1,495, up from $1,199 for 601. I’m not saying it’s not worth the price—it definitely is—but I wonder if it isn’t time to think about splitting off that extra-fine modeling and rendering engine and making it available for the kind of money older, more limited versions of modo commanded.
See for yourself. Give modo a free try at Luxology.com/trymodo/.
Contributing Editor Mark Clarkson is DE’s expert in visualization, computer animation, and graphics. His newest book is Photoshop Elements by Example. Visit him on the web at MarkClarkson.com or send e-mail about this article to [email protected].
More info
modo 701
Individual License: $1,495, Individual License Upgrade: $495
Subscribe to our FREE magazine, FREE email newsletters or both!
About the Author
Mark ClarksonContributing Editor Mark Clarkson is Digital Engineering’s expert in visualization, computer animation, and graphics. His newest book is Photoshop Elements by Example. Visit him on the web at MarkClarkson.com or send e-mail about this article to [email protected].
Follow DE

