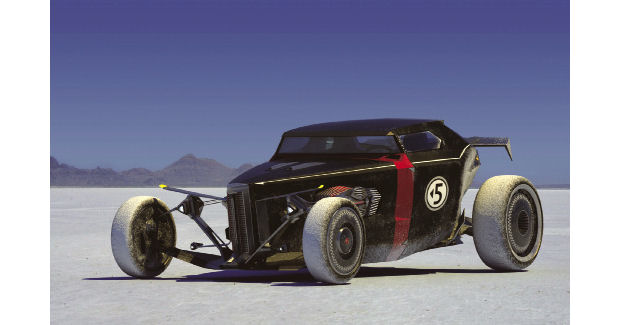
MODO 801 render of a hot rod designed by Scott Robertson.


Latest News
January 1, 2015
 MODO 801 render of a hot rod designed by Scott Robertson.
I’ve been using MODO since version 302, way back in 2008 (when it was spelled ‘modo.’) Since then, it’s grown from a neat but bare bones polygon modeler to a robust modeling and animation package that supports complex assemblies, dynamics, particle effects and long, wavy hair.
What’s New … and Relevant?
Admittedly, as a program matures, new features can grow increasingly obscure for particular users. I always struggle to decide what’s relevant. Someone’s excited about 801’s improved tools for styling long hair, but it’s probably not this magazine’s readership. If you’ve been anxiously awaiting support for rounded edges in material baking then good news, it’s here. If you haven’t, then it’s hard to get too worked up about it.
So, what new features does MODO 801 have to offer that might be of interest to the majority of design engineers? Here’s what stood out to me.
It’s a Snap
Sometimes, the big improvements can be easy to overlook at first. MODO’s new snapping tools are a good case in point. Snapping’s not especially sexy, and Snapping worked fine in 701. But MODO’s Snapping has been completely rebuilt and streamlined considerably.
Now, instead of selecting Vertex Mode or Polygon Mode, you click on a Snapping feature—vertex, polygon, pivot, etc.—to turn it on or off. You can have any number of Snapping features enabled at once, so you can snap to the grid, straight lines and object vertices at the same time.
Snapping is now context sensitive. You can select different snapping features to be active globally, in item mode, or in component mode. One set of snapping rules applies if you’re working with polygons, but another set applies when you switch to item mode. You can save combinations of features as Snapping presets. You might find one combination of features useful when tracing architectural drawings, but another combination better for building complex mechanisms. Save each as a preset, to be selected later from a drop-down box.
801 adds a lot of new Snapping features. You can now snap to instances, to the intersection between objects, and to the corner or center of a bounding box.
While some new features I’ll use rarely, if ever, I use Snapping constantly so the rebuild is much appreciated.
 Objects in MODO can be linked to web pages, external files or scene controls.
Nodal Shading
Arguably the most visible addition in 801 is MODO’s new Nodal Shading system. Nodal Shading doesn’t replace MODO’s existing layer-based Shader Tree; it exists sort of at a right angle to it. The (entirely optional) nodal system feeds into the Shader Tree.
Nodal Shading setup takes place in MODO’s Schematic Editor, which was previously reserved for setting up particle systems or rigging assemblies.
To create a texture you use a channel from one node (e.g. x location, or red, green values) to drive a channel on another node (e.g. y location or blue values.) You can hook red to red, red to blue, or red to specular value or bump amplitude.
You can hook up any number of nodes. You can use a single node to drive different values on the same texture, or different values on altogether different textures. You can perform basic math on channels, multiplying or blending them together. You can even apply logical constraints.
If you’re already familiar with MODO’s Schematic Editor, you’ll feel at home pretty quickly. If not, it will take you a while to find your bearings. But remember, the Shader Tree is unaltered. For many, though, creating complex textures through the new nodal interface will feel more comfortable, or at least more familiar, than MODO’s somewhat idiosyncratic Shader Tree.
Improved UV Mapping
UV (ultraviolet) mapping is my personal Kryptonite. MODO’s UV tools are as good as any I’ve used, but I still fight with UV mapping. Fortunately, 801 addresses one of my pet peeves—the difficulty of getting symmetrical meshes to produce symmetrical UV maps. There are now some new tool options that enforce symmetry, making my mapping jobs a lot easier.
801 also has the ability to merge separate UV maps into a single map, as well as some new unwrapping methods. These are always welcome as one of the challenges of UV mapping is finding the best method of unwrapping a particular part or model.
Animating with the Spacing Chart
801 includes a new method of laying out animations using a Spacing Chart. Instead of worrying about timing up front, animations with the Spacing Chart are built around poses. To a traditional animator, these poses would be running or jumping; to a designer they might be a car suspension articulating, or desk drawers opening and closing. Once you’ve created and ordered all the poses you need, you then adjust the animation’s timing by playing with the spacing between poses.
It’s a different way of approaching animation.
Onscreen Controls
MODO has a cool feature that’s not new to 801; it’s been around for a few versions, but I haven’t really given it much thought before now. It’s shown off perfectly in one of the showcase pieces that comes with 801—a sample scene that lets you play around with a concept hot rod designed by Scott Robertson. Load it up and you’re presented with a cool car sitting out on the salt flats somewhere. You can play with the geometry, materials and lighting as much as you’d like.
Hovering in space near the car itself are three balls labeled ‘roof line,’ ‘salt painting’ and ‘render passes.’ Floating above it in the sky are two thumbnails images. All five of these objects are active; click on the ball labeled ‘render passes’ and you can choose the camera view, the time of day, or the color of the car’s paint. Click on the thumbnails, or the other balls, and MODO will take you to a web page and play a video or audio file.
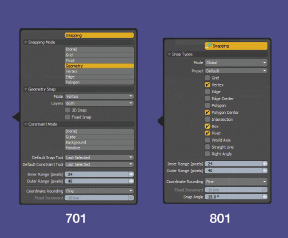 A comparison of the Snapping settings in MODO 701 (left) and MODO 801 (right). 801 Has significantly streamlined the Snapping interface.
You can, similarly, create controls for different parts of your assembly—maybe a slider that steers the front wheels, or opens the trunk. The full extent of this capability is a bit obscure but at a minimum, in combination with render passes, it’s very powerful.
I finally understand just how very useful this kind of capability could be in a collaborative environment, allowing people to safely look at different lighting, paint, camera views and so on, without having to understand much about the models or the application.
Shatter, Bubbles and More
There are, of course, lots of other goodies scattered throughout the new release. The new Shatter command will break up a mesh into whatever size chunks you desire so that MODO’s dynamics system can make your objects explode, or drop and shatter on the floor. The new thin film and iridescent materials let you create realistic soap bubbles and oil films. OpencolorIO color management helps to tie MODO together with other Foundry applications, such as the 3D painting tool, MARI.
GL Measures allow you to display information about models and assemblies—measurements, distances, meters and bar graphics and simple text—directly in the viewport.
MODO does a reasonably good job of reading many standard file formats including STL, OBJ and SolidWorks parts and assemblies. Still, if your work includes importing and exporting a lot of meshes to and from CAD applications, you’ll probably want to look into the Power Translators plug-in, which facilitates importing and exporting standard CAD file types.
Want to see how well MODO integrates into your workflow? You can download a free 30-day trial version at thefoundry.co.uk/products/modo/trial/.
More Info
Subscribe to our FREE magazine, FREE email newsletters or both!
Latest News
About the Author
Mark ClarksonContributing Editor Mark Clarkson is Digital Engineering’s expert in visualization, computer animation, and graphics. His newest book is Photoshop Elements by Example. Visit him on the web at MarkClarkson.com or send e-mail about this article to [email protected].
Follow DE

