
The flexible material is required to provide a weather-proof seal between the rigid button and case while still permitting button actuation. Image courtesy of Root3 Labs.

Latest News
July 21, 2016
By Gregory Herwig, senior mechanical engineer, Root3 Labs
The NEON Indoor Location Service by TRX Systems locates and tracks personnel in areas without GPS including inside buildings, outdoors in urban canyons and underground. TRX’s patented algorithms combine data from all available sensors along with a unique database of location assistance information to calculate location. The tracking unit is a small wearable electronic device that houses many of those sensors.
At Root3 Labs, we specialize in applied research, rapid prototyping and design for manufacturing. We work with our clients to turn ideas into prototypes and prototypes into finished products. Last year, we teamed up with TRX Systems to help with the manufacturing development and prototyping of the wearable tracking unit for the TRX NEON Indoor Location service.
Problem
The device is intended for use in public safety and industrial environments, where it may get wet during normal operation and could potentially be submerged. However, a large button was required on the front face of the electronic wearable device to support operation with gloves. The gap present between the button and the case needed to be sealed while still allowing button actuation. The required actuation distance and desire for a rigid button eliminated the possibility of using a flexible membrane to function as the button.
Root3 Labs investigated several design options to create this seal, but all had their limitations. There was too little space available on the inside of the case to implement any multiple-part solution such as an o-ring gasket and spring clip. This lack of interior space and the small volume of the wearable device also meant that it was not feasible for us to use a film adhesive or ultrasonic weld to attach a gasket to the case and button.
Solution
The most promising design option was overmolding a flexible thermoelastic polymer (TPE) between the rigid button and the case. Unfortunately, the cost and lead-time associated with injection mold tooling would make anticipated aesthetic or functional design iterations impossible to undertake on the project’s budget and timeline. We needed a method for quickly and cost-effectively building functional prototypes that reasonably simulated a TPE overmold. RTV and urethane casting overmolds were considered, but the part design was not well-suited to that approach, meaning that cost and time savings would be minimal.
Multi-material 3D printing offered a possible solution. PolyJet technology by Stratasys is an option for multi-material 3D printing that uses photopolymers, materials that are cured when exposed to light. The PolyJet printer sprays the outline of parts using photopolymer materials and then cures them nearly instantly with an ultraviolet lamp.
It is possible with the PolyJet technology to use multiple materials during the same print and to have them bond to one another. In this way, a part is built with flexible and rigid sections. Multi-material 3D printing is typically used to simulate overmold applications such as handle grips or living hinges. While somewhat outside of typical applications, our research into the technology revealed no technical reason why it could not be used to create a flexible, circular gasket between two rigid parts (Fig. 1).
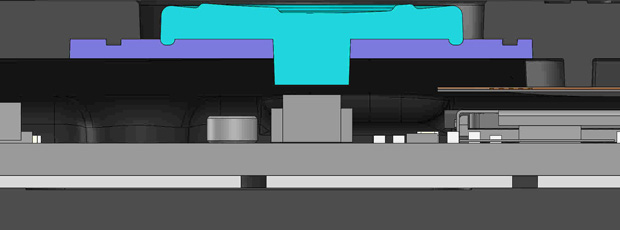 The flexible material is required to provide a weather-proof seal between the rigid button and case while still permitting button actuation. Image courtesy of Root3 Labs.
When using PolyJet technology, multi-material 3D printing is available with one type of rigid material and one type of flexible material, offered in different durometers. The rigid material we selected was PolyJet VeroWhitePlus. It is an opaque and durable material that is capable of producing fine feature details. It is well-suited for prototyping an electronic enclosure and is printed at a resolution sufficient for the small features of this design. The ability to print with fine resolution was important so that small retention features could be added to the rigid parts to provide more surface area for bonding with the printed flexible material.
The flexible material we selected was from the PolyJet Flex family. This family of materials is available in a range of durometers from 27A to 95A. It is available in black and prints in a resolution matching that of the PolyJet VeroWhitePlus. Our previous experimentation suggested that a material with a durometer of 40A would deliver the button-actuation feel that was required for the application, so we used PolyJet Flex Black 40A for initial prototypes.
Lessons Learned
Using a multi-material 3D printing process allowed us to prototype design changes in a matter of days with no capital costs. We could easily change the flexible material from one print to another in order to determine what thickness and durometer of material was most appropriate for the application. Using this prototyping approach also meant that we could modify aesthetic and functional features of the printed part while the other mating parts and electronics were undergoing their own design iterations (Fig. 2). In this way, multiple components of the wearable electronic device could be concurrently iterated, prototyping time could be reduced, and the project could more quickly proceed to production parts.
 The multi-material 3D-printed parts progressed through several iterations to develop the appropriate design. Left: front view; Right: rear view. Image courtesy of Root3 Labs.
We used the prototypes for preliminary device testing and to confirm the validity of the design. The PolyJet VeroWhitePlus rigid material performed well as an electronic enclosure and as an actuation button. The PolyJet Flex material bonded well to the rigid material and mimicked the elasticity of TPEs. This made it possible for us to use the printed prototypes to confirm that an injection overmolded design would provide sufficient button travel without damaging the flexible material and that it was also capable of delivering satisfying button-actuation feel.
The effort we put into developing the design using PolyJet printed parts was rewarded when it was time to transition to injection overmolded production parts. We were able to use the iterated design from the multi-material 3D printed prototype parts with only minor adjustments for tooling shutoffs and ejector pins. The overmold parts were functional and useable from the time that the first shots came off of the injection mold tools (Fig. 3).
 After developing prototypes using multi-material 3D printed parts, the design was smoothly transitioned to injection molded parts with a thermoelastic polymer overmold. Left: front view; Right: rear view. Image courtesy of Root3 Labs.
Summary
By utilizing multi-material 3D printing technology, it was possible for us to simulate the injection overmolded parts that were desired for production. While multi-material 3D printing is typically used to simulate overmolds, the rigid-to-flexible-to-rigid construction of this design ended up being a good fit to the technology. The design cycle was reduced and the prototyping costs were minimized, allowing for a robust design iteration process. We applied the lessons learned during the prototyping process to the design of the production parts, enabling a nearly seamless transition to injection mold tooling.
More Info
Subscribe to our FREE magazine, FREE email newsletters or both!
Latest News


