

Latest News
January 1, 2011
By Mark Clarkson
 The SHOT renderer progressively refines the image. |
Bunkspeed SHOT is focused on one thing: It produces photorealistic still images of models created in other applications, and it produces them in a minimum of time with a minimum of fuss. In fact, it produces them almost instantly.
Super Simple
Good news for those new to 3D rendering, or those sick of learning the ins and outs of new applications: Bunkspeed SHOT is designed to be as super-simple as possible.
For example, when you open a file, SHOT automatically begins rendering it. You don’t even have to press a button, just open the file and wait a bit. Another example: There are no quality settings. There’s no mucking about with ray bounce settings, photon emission or shadow quality. Everything is turned on and set to its highest quality at all times. The final quality of the render depends on how long you feel like letting it run.
SHOT iteratively refines the render. With every pass—SHOT calls them frames—each pixel gets closer and closer to its theoretical “perfect” value. It’s a bit like watching a progressive download JPG from the olden days of dial-up connections. You can save the onscreen render at any time. SHOT keeps refining until you stop it, giving you a running total of frames rendered along with the current frames per second.
It’s done when it looks done.
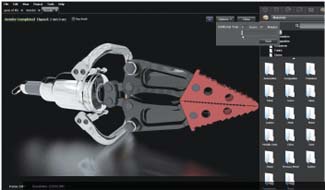 If the finished render hasn’t achieved the quality you want, you can add more render time. | 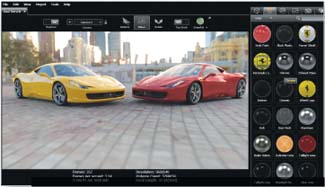 Materials for the current scene are accessible via the explorer pane. |
Change the camera’s depth of field, add an object, move an object, or adjust a texture and SHOT starts the render over again. Fortunately, those renders are stunningly quick.
GPU Adds Speed
SHOT employs mental images’ iray technology for interactive photorealistic rendering. One often hears the phrase “real time” bandied about, but it’s not real time. It is ferociously fast, much, much faster than my normal rendering applications.
SHOT—and iray—pull this off by leveraging all the processor cores in my graphics card, as well as those in the CPU. iray runs on NVIDIA’s CUDA parallel computing architecture. CUDA-capable NVIDIA cards contribute their GPU processors to the computing task at hand.
I ran SHOT on a dated Dell XPS workstation with a dual-core CPU and NVIDIA Quadro card. I then started testing with a Quadro FX 4800 with 192 64-bit GPUs. Performance didn’t increase by a factor of 100, but it did jump by a factor of six or so, increasing from 0.6 frames per second to 3.6 frames per second in my 3.77 million-polygon test scene.
I then swapped the FX 4800 for a Quadro 5000 with 352 GPUs. This pushed performance up to 5.2 frames per second—roughly an order of magnitude faster than the CPU alone.
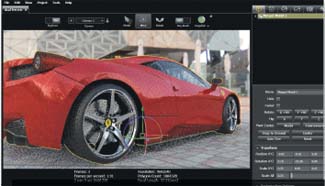 You can duplicate, move, rotate and scale objects to place them where you want them in the scene. | 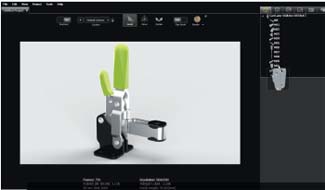 Browsing through the parts of an imported SolidWorks assembly. |
SHOT doesn’t actually require a CUDA-capable card to run. You can render using just the CPU, just the GPUs, or both. (Even in GPU-only mode, SHOT kept one of my cores pumping at 100%.) SHOT’s pretty fast running on just the CPU, but to see it really do its stuff you’ll need a lot of CUDA cores.
In GPU or GPU+CPU mode, SHOT visibly sucked the performance out of my system. My mouse moved in little jumps and hops across the screen. When you want to start moving objects around on the screen, it’s time to switch ray tracing off. In raster mode, response actually is in real time. Raster mode looks pretty good, with reflections and highlights.
Minimal User Interface
SHOT’s interface has been pared down to a bare minimum. There’s only one window. There are no orthographic views (top, front, etc.). Everything is done looking through the camera, although you can have multiple cameras so that you can observe your scene from different positions.
A tool bar at the top gives access to cameras, the selection tool, move and rotate tools, and a render button. Here you can turn ray tracing on and off and enable the Ray Brush. If this still takes too much real estate, you can “un-pin” the toolbar to automatically hide it.
The right side of the screen is an explorer window that lets you browse through materials, models, parts, environments and so forth. The model tree shows small 3D snapshots of the parts, which pop up to a larger size when you mouse over them.
SHOT provides you with genuinely useful tooltips. Hover your mouse over the Roughness slider on a plastic material, for example, and you’ll get the tip: “Roughness decreases reflectivity” rather that the usual (and useless) “Drag to increase/decrease roughness.” Kudos, Bunkspeed!
SHOT’s version of a render region is an interactive tool called the Ray Brush. When the Ray Brush is active, you get a resizable circular region on the screen, similar in appearance to a Photoshop brush. As you move the Ray Brush around the screen, all of SHOT’s rendering power is applied within that circular region. If the car body looks fine but the chrome wheels are a bit spotty, use the ray brush to focus SHOT’s renderer on them. The Ray Brush provides optional magnification of the highlighted area as well.
Working with Models
You can’t model in SHOT. Alright, you can. A little bit. Unlike its predecessor, Hypershot, SHOT allows you to create and manipulate an assortment of basic primitives—cones, spheres, tori, tubes, arrows, walls, planes, boxes and so forth. These are useful for creating floors, walls and tables to hold your models, and also for creating lights through the use of emissive materials.
Aside from these primitives, though, all of your models will come from outside applications such as SolidWorks or 3ds Max. Bunkspeed offers free plug-ins for Creo Elements/Pro, SolidWorks and Rhino that launch SHOT from within those applications.
SHOT also supports the import of a goodly number of file formats including 3ds, STL, FBX, Collada and SolidWorks parts and assemblies. It can auto-size imported objects and snap them to the ground plane. You can select by model, part or material and perform the usual movement, rotation and scaling transformations. If you have an array of objects, SHOT will arrange them for you in lines or circles.
Retexturing Materials
Materials on imported models range from not-quite-right to not-there-at-all, so you’ll need to retexture them before rendering. Fortunately, SHOT’s material editor is basic and easy to use.
Choose a material from the basic types—glass, metal, paint, matte, etc.—and adjust its relatively few settings. Materials only have controls pertinent to that particular type. Painted materials have clear coat settings. Metal materials have roughness. Emissive materials have intensity. You can add textures maps to control color, bump, specular and anisotropics.
You cannot build the kinds of infinitely complex materials here that you can in, say 3ds Max. SHOT’s materials are limited but adequate and, moreover, pretty easy for non-technical types to understand and manipulate. If you want shiny red metal, you select the metal material type, make it red and turn the roughness down.
Environments and lighting
Basic lighting in SHOT is provided by high dynamic range (HDR) environments. In essence, SHOT uses the light from a photograph to light the scene. Drag in an outdoor, environment and your model gets outdoor lighting complete with reflections of clouds, sky and mountains. Or, drag in a photo studio, or a kitchen. Light, shadows and reflections are automatic and accurate—no lights required. You can adjust the brightness of the environment, spin it around, and make the ground reflective. You can also make the environment invisible. It still provides the scene lighting, but doesn’t show up in the final render.
SHOT also lets you construct lights of a sort by creating simple primitives and assigning them emissive materials. There are no IES standard lights—no real-world light settings at all. It’s more of a by-guess-and-by-gosh process of sliding the material’s intensity slider around. But, again, it’s easy and interactive.
Rendering
What about when the time comes to, you know, really render? SHOT’s interactive, on-screen render is actually good enough for lots of uses, but when screen resolution isn’t adequate, push the Render button and create whatever size and quality you need.
Remember that there are no quality settings, per se. To tell SHOT when to stop, you set a time limit, or limit the number of frames to be rendered. Don’t let the reference to “frames” deceive you. SHOT has no animation capabilities. I’m sure Bunkspeed will be addressing that shortly.
Even the final render is fairly interactive. You can use the Ray Brush here to focus the renderer on areas needing extra work. You can watch the render as it refines and save it when it looks good enough. Conversely, if, at the end of your allotted render time, the image isn’t up to snuff, you can add more render time.
SHOT’s focus on ease of use may alienate some advanced users who want to create 20-layer material trees or emulate a Canon F/1.4 50 mm lens. SHOT is a one-button mouse in a world of programmable 3D peripherals. But it’s fast, it’s easy and it makes beautiful pictures. Did I mention it’s fast? I like it a lot.
Download a 30-day trial version at bunkspeed.com/shot.
More Info:
Bunkspeed
Bunkspeed SHOT
Price: MSRP: $995
Contributing Editor Mark Clarkson is DE’s expert in visualization, computer animation, and graphics. His newest book is “Photoshop Elements by Example.” Visit him on the web at markclarkson.com or send e-mail about this article to [email protected].
Subscribe to our FREE magazine, FREE email newsletters or both!
Latest News
About the Author
Mark ClarksonContributing Editor Mark Clarkson is Digital Engineering’s expert in visualization, computer animation, and graphics. His newest book is Photoshop Elements by Example. Visit him on the web at MarkClarkson.com or send e-mail about this article to [email protected].
Follow DE

