Latest News
December 14, 2011
Project Falcon, Autodesk‘s latest technology preview at Autodesk Labs, is flying straight into the chambers where specialists conduct wind tunnel tests. The downloadable application functions as an independent software program, but it’s designed to complement surfacing programs like Autodesk Alias.
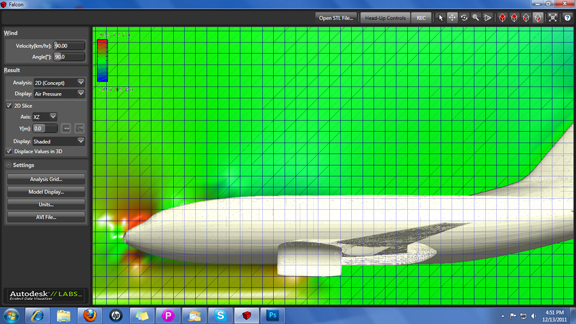
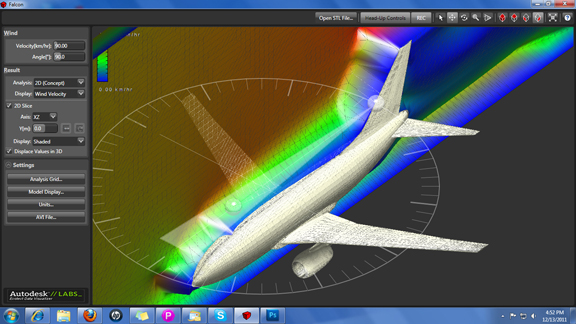
Once installed, Project Falcon allows you to import a design as an STL file, then simulate a wind tunnel test on it. The interface is fairly straightforward, with just enough controls to let you run basic tests. You set the wind velocity and direction, set the analysis plane’s orientation, specify the type of results you want to see (pressure, airflow, or displacement volume), then watch the screen come to live.
The results—wind flow patterns and pressure fields—are displayed in real time (or near real time speed, if your computer has slower processors). Specialists who wish to do more detailed FEA and CFD analyses may need more sophisticated packages, but for design engineers exploring different geometric shapes and curvatures, Project Falcon’s tool set is just the right amount.
If you wish to share your results with someone, or keep a record of it to defend your decisions, you may record the wind tunnel test results as AVI files and save them to your local drives. For a wind tunnel simulation program, the software is surprisingly lightweight. It runs on a typical workstation or PC (obviously, if you have multicore CPUs with larger memory footprint, you’ll get better performance).
In my view, digital wind tunnel simulation is not a replacement of physical wind tunnel test, but an easy-to-use software like Project Falcon can help steer you in the right direction in early conceptual phases. You can use it to avoid designs that have problematic geometry and curvatures so that when the physical prototype is ready to go through a real wind tunnel test, you can be confident it won’t produce catastrophic design flaws.
For more, watch the video demonstration below:
Update: I couldn’t resist the idea of running a wind-tunnel test on my own head, so I did it. Here’s the process:
- Take a series of 2D photos of my head from different angles.
- Upload them to Autodesk 123D Catch to produce a 3D scene.
- Save the head model as a mesh model in OBJ.
- Open the OBJ model in Autodesk 123D, save it again as STL.
- Run wind tunnel test on the STL model in Autodesk Project Falcon.
Subscribe to our FREE magazine, FREE email newsletters or both!
Latest News
About the Author
Kenneth Wong is Digital Engineering’s resident blogger and senior editor. Email him at [email protected] or share your thoughts on this article at digitaleng.news/facebook.
Follow DERelated Topics


