January 23, 2012
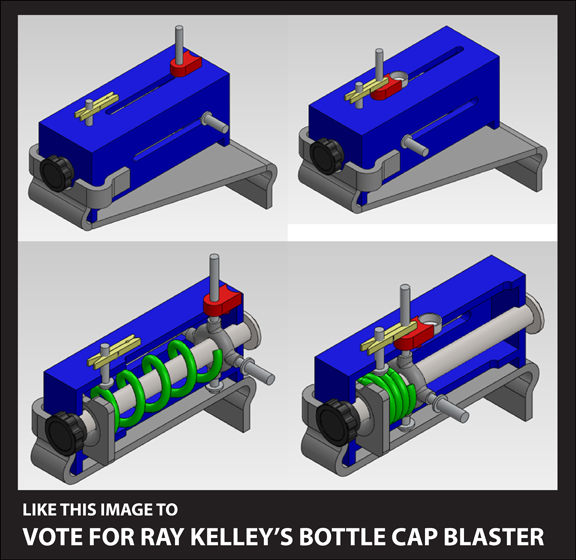
Editor’s Note: In early December 2011, DE invited readers and fans to submit their ideas for a cubicle toy. After the honorary judges have reviewed and scored more than 80 entries, three finalists emerged. Ray Kelley’s bottle cap blaster is one of the finalists. Here is his final entry, along with an essay in his own words explaining the evolution of his design. He hopes to get not only the judges’ votes but yours too. To vote for Ray Kelley’s design, visit DE’s Facebook fan page and click Like on this image.
Ray Kelley in his own words
I set out to create a fun, cool cross bow-type toy with enough attention to detail that it might actually be made and used without serious injury, especially by me with my large water bottle cap collection. With that focus and the core directions of the contest in mind, I wanted to add as many simple, quality features that would enhance function and fun as possible, keeping the overall assembly small so it’s easy to handle and use. Overall, most elements amuse and annoy, and hopefully others will inspire and maybe even amaze.
General plan
The main parts of the design are the launch assembly, drive spring components, trigger mechanism, elevator components, and structural housing components, but first some general ideas. Since this was my first cross bow design of this type, sizes of components were frequently rounded to fractional inches, and some components are much sturdier than necessary; further refinement and analysis based on particular materials would likely lead to thinner components in some cases.
The materials assumed for most components is either steel, possibly stainless for appearance, or aluminum, for weight savings and more portability; carbon steel fasteners, and plastic for the ammunition cradle and sheet metal clips. Some practical manufacturing methods were considered, but some items are presented as they could be made, and details can certainly be reconsidered. The fastening method focus was to enable user disassembly for repair, modification, or just curiosity, so nothing permanent or needing special tools would be required in the assembly/disassembly process. This led me to use mostly use simple pins and shafts restrained by e-rings and wave springs that would also function as washers, rather than threaded fasteners on small screws that would need space on both sides. Instead of deep tolerance stack-ups, I used methods and parts that allowed for room to maneuver with good boundaries and for some take-up.
Components and function
The housing components include the exterior housing, the center rod, and the related components. The center rod serves as a center axis for the launch assembly and drive spring, holds the housing together, and includes a threaded portion for the positioning plate. The positioning plate allows for an increase in spring pre-load through the handle knob on the back side. On the bottom of the housing are two sheet metal clips to make sure the housing overlap is minimal to reduce pinching. The housing ends are large enough for a medium-sized hand to reach inside for assembly or disassembly.
The launch assembly includes the cradle for the ammunition, the center hub ring, the alignment pins, and e-rings. The center hub ring is a solid ring with the alignment pins threaded in. The horizontal alignment pins are also used for loading by grabbing both in one hand underneath the housing or one in each hand and pulling back; the pins and cradle are limited outside the housing by e-rings and move through slots. The cradle also connects to the trigger.
The drive spring is a crest-to-crest wave spring to get a large output from a small working and free height. The drive spring shown is based on a standard vendor model, so it needed a floating spring core to keep it aligned on the center rod.
The trigger mechanism is similar to a rubber band gun. The trigger rotates around a fixed pin and is secured by a small socket head screw and nut. It is reset when the cradle is returned to the loaded position, counterbalanced by a lever spring, and both are held in place by an e-ring
The elevator assembly allows for angled aiming. The contact points are on the outside cam levers that travel about one stationary pin and another through a slot. The slot controls the elevators’ incremented position through a gear-like slot. The elevators are held in position by two springs within sleeves acting on the lower pin, which should allow for easy movement when needed and stability when not. (Spring Sleeves are currently shown as a cylinder in the model).
Other planned items for future development are the ammunition loader, which would have a clip and an auto-load function activated when the load pins are pulled all the way back, and a forward sight, mounted internally so it peeks out below or above the center rod.
—Ray Kelley
Honorary judge Tony Lockwood, DE’s editor at large, on Kelley’s design: I have a confession to make. All the designs were so good that I unilaterally decided to add one more criterion to the judging guidelines. To whit: Which Cubicle Toy would Steve Robbins, DE’s Executive Editor, use to torment a co-worker’s dog? See, Robbins kept a laser pointers in his desk, armed and ready for Jack Nelson to accompany his master to work. Three, four times a day, Steve would whip the thing out then laugh hysterically as Jack bounded about the normally staid halls of DE chasing the red dot. I call this extra-judicial metric the Robbins Razz.
When held to the Robbins Razz/Human Variant standard, Ray Kelley’s Bottle Cap Blaster is winner. His use of readily available components – scraps of sheet metal and common fasteners, for example – also epitomizes the best of “use what you got” engineering ingenuity. Ray also earned an A+ for the detailed description that accompanied his design.
Honorary judge Josh Mings (SolidSmack) on Norwood’s design: It’s fun and actually practical from a ‘what kind of dangerous office toy can I create?’ perspective. I imagine this being the cause of many people laughing and also being lacerated and/or fired, which always makes a great story one day. [Editor Note: Josh is being facetious here, so please don’t take this literally.]
To vote for Ray Kelley’s design, visit DE’s Facebook fan page and click Like on this image.
Subscribe to our FREE magazine, FREE email newsletters or both!
About the Author
Kenneth Wong is Digital Engineering’s resident blogger and senior editor. Email him at [email protected] or share your thoughts on this article at digitaleng.news/facebook.
Follow DERelated Topics


